The importance of measuring primary implant stability
Featured Products Promotional FeaturesPosted by: Dental Design 26th June 2021

In the first of a two-part series of case studies, Dr Kunal Shah demonstrates how the Osstell Beacon from W&H supports the delivery of predictable dental implant treatment.
A female patient in her 40s was referred to the practice. She had been a long-standing attendee that was fit and well with no medical issues and she was also periodontally and restoratively stable. The main concern was that her LR7 had a vertical root fracture. As the LR7 had a hopeless prognosis, extraction was indicated and treatment options to restore the space were provided to the patient, including a denture, bridge or dental implant. The option of leaving the gap was also given.
With regards to implant treatment, the patient was offered either immediate or delayed implant placement. She decided on delayed implant placement, as we were keen to allow the bone to heal properly post-extraction and regain its strength and density. In addition, her dental function was normal up to her first molar, which meant there was no rush to restore the LR7. Once treatment was explained to the patient and consent obtained to proceed, extraction of the LR7 was carried out atraumatically.
Treatment planning
Following six to eight weeks of healing post-extraction, the patient returned to the practice for a CBCT scan so that the inferior dental nerve (IDN) in the lower jaw could be evaluated. We also wanted to assess any concavities, the buccal-lingual width of the bone, and the distance from the crest of the alveolar ridge to the IDN in order to ensure that treatment planning and placement of the dental implant would be correct.
In cases like this, it is important to ensure that the implant is placed in occlusion with the opposing teeth. This revolves around following a prosthetically driven approach, in which the placement of the final restoration is determined first so that the implant is positioned correctly. For this case, it was essential that the implant be placed on the lingual aspect to ensure we cleared the IDN and obtained a desirable result. Treatment was planned with a NobelReplace Conical Connection PMC 4.3x10mm dental implant.
Implant surgery
Once we obtained consent from the patient, surgery began with an injection of local anaesthetic to numb the area, before an incision was made to raise a surgical flap. We used the WS-75 L surgical handpiece and the Implantmed Plus surgical unit from W&H, which was pre-set to an implant programme. The unit’s wireless foot control was really useful in this case, making it easy to manoeuvre as required without cables getting in the way.
After assessment of the bone, a step-by-step drill sequence was followed – the bone was very dense so we used a dense bone drill at the surgical site to the same length as where we wanted to finish. The reason for this was that it enabled the implant threads to better engage with the bone during placement.
Once the surgical site was prepared, the implant was then placed. At this point, we wanted to make sure we had achieved good primary stability of the implant, which is when the W&H Osstell Beacon proved really useful. We placed an Osstell ISQ SmartPeg specific to the implant and used the Osstell Beacon to measure the Resonance Frequency Analysis (RFA), which enabled us to evaluate the primary stability of the implant.
In this case, we found that we had achieved excellent primary stability of the implant, which was indicated by the Osstell Beacon flashing green and providing a mesio-distal and buccal-lingual Implant Stability Quotient (ISQ) reading of 74 and 72. The data obtained with this device provided a safety net from a litigation point of view, as it demonstrated that we achieved good primary stability at the time of placement. The Osstell Beacon itself is really straightforward to use and easy to set up in combination with the Implantmed Plus – you just have to make sure that the treatment site is dry when you employ the device and that you order the correct Osstell SmartPegs for the case.
The Osstell SmartPeg was removed and as we knew the primary stability of the implant was good, a healing abutment was placed and the surgical site sutured without tension in the soft tissue. The patient was then sent away with routine post-surgery aftercare instructions. At this point, we typically request that the patient returns in two weeks’ time for a review, before the implant is allowed to fully osseointegrate over at least 3 to 4 months.
Images
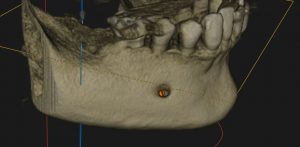
Figure 1 – CBCT Scan 3D Render showing LR7 region
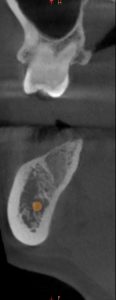
Figure 2 – Sectional Slice showing LR7 region and IDN
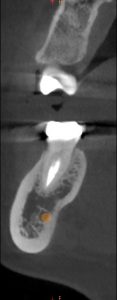
Figure 3 – Sectional Slice showing LR6 and IDN for comparison with Figure 2
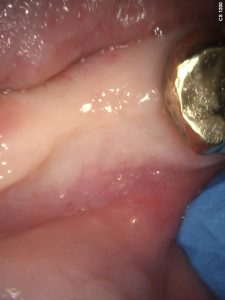
Figure 4 – IO Image showing LR7 edentulous region
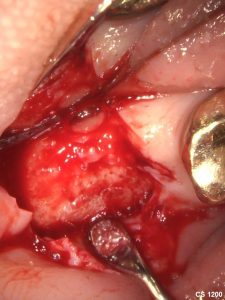
Figure 5 – IO Image showing incision and Flap Elevation
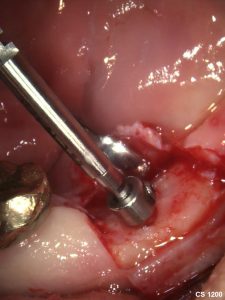
Figure 6 – IO Image showing NP 3.6x10mm Drill Fully Seated Lingual View
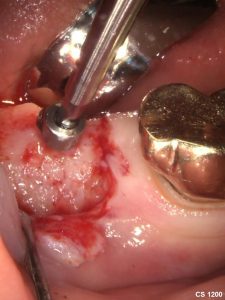
Figure 7 – IO Image showing NP 3.6x10mm Drill Fully Seated Buccal View
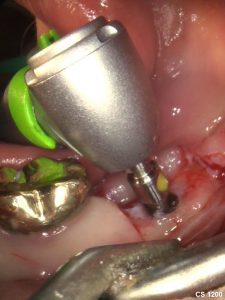
Figure 8 – IO Image showing RP 4.3x10mm Drill Fully Seated Lingual View
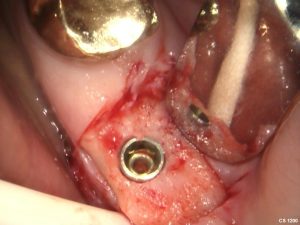
Figure 9 – IO Image showing RP 4.3x10mm Replace CC PMC Implant Seated Occlusal View
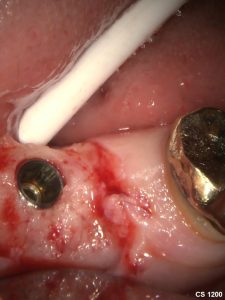
Figure 10 – IO Image showing RP 4.3x10mm Replace CC PMC Implant Seated Buccal View
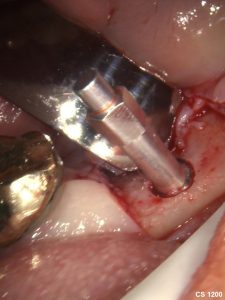
Figure 11 – IO Image showing SmartPeg for RP 4.3x10mm Replace CC PMC Implant Seated Lingual View
![]()
Figure 12 – IO Image showing SmartPeg and OStell Beacon for RP 4.3x10mm Replace CC PMC Implant Seated and measuring Torque Strength Lingual View
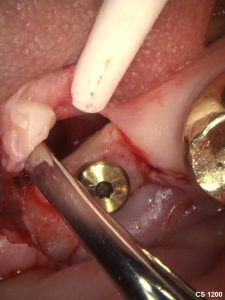
Figure 13 – IO Image showing Healing Abutment on Implant and Lingual Wall Intact
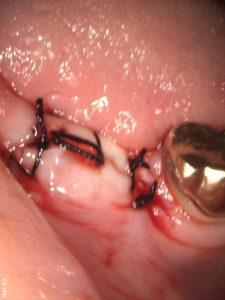
Figure 14 – IO Image showing LR7 sutures
To find out more visit www.wh.com/en_uk, call 01727 874990 or email office.uk@wh.com