Dr Sandeep Sadana (Dr Sunny) began his dental journey at Bart’s and the Royal London School of Medicine and Dentistry, simultaneously serving in the Army Reserves with the University of London Officers Training Corps. Dr Sunny now runs his own restorative referral service and provides educational courses (www.drecomposite.com).
He presents a novel approach for restoring fractured anterior teeth with high-quality direct composite.
Patient background
A female patient in her mid-thirties was seen after being involved in a hit and run accident that luckily only affected the dentition. She did not report pain but just that the teeth felt sore, especially when biting into food (fig 1).
Assessment and diagnosis
Initial assessment was performed by my colleague who confirmed the traumatic injury and localised the affected teeth to the four upper incisors (fig 2):
- The UR2 suffered the most extensive fracture
- The UR1 had a visible hairline fracture
- The UL1 and UL2 had fractures localised to the enamel
- All four teeth in question (TIQ) tested vital to cold spray
- All TIQ were tender to percussion
- Radiographs did not reveal any endodontic treatments, periapical pathology or root fractures
- None of the TIQ had mobility
It was explained to the patient that the teeth had suffered concussion. She was recommended a soft diet and to avoid chewing on the affected teeth.
After initial investigation by my colleague, restorative options were presented. The patient was then referred to me for composite restorations.
The patient was informed about the risk of the tooth requiring root canal treatment in the future, despite being asymptomatic now, and the associated treatment fees. I find that being transparent about possible monetary and time commitments reduces the chances of miscommunication-related issues later on, allowing patients to provide fully informed consent.
Treatment planning
At the initial visit, all incisors were still vital and aesthetics were the patient’s primary concern. I used a consultation aid software called Chairsyde to help her visually understand what was going on – this technology has definitely improved my case acceptance across the board.
An intraoral mock-up was carried out in which different composite shades were placed directly on the teeth (without etching or bonding) to find the best match. (fig 3) The teeth were dried first to ensure the composite was easy to handle. During the intraoral mock-up, the composite was extended over the incisal edge, rather than only placed on the tooth surface, to allow us to see light passing through the material.
At this point, the patient was asked which colour they liked best. Joint decision-making is preferable for aesthetic cases, to relieve the pressure of full responsibility based solely on the clinician’s opinion. A photo was also taken to record the consent process.
I chose to use BRILLIANT EverGlow® from Coltene which comes in a dual shade system (e.g. A1/B1, A2/B2, A3/D3) and, in my experience, it blends really well into natural tooth tissue. Not to mention it handles well without the need for a composite heater and polishes quickly to a really high gloss. I’m a big fan of simplicity!
The patient had visible white and brown spots on her upper anteriors and, after discussion, we agreed that it would look natural to include the white spots in the UR2 restoration. I planned to use a body shade for the dentine and then translucent BRILLIANT EverGlow® for the enamel. The enamel shades come in Translucent and Bleach Translucent for patients with whiter teeth.
Treatment provision
Local anaesthetic was provided as a single buccal infiltration using Articaine 4% 1:100000. Using a high-speed handpiece and red band diamond bur, a short bevel was created on the UR2, UL1 and UL2 edges. A slow handpiece and medium disc were then used to create a long bevel as well as remove surface contaminants and provide fresh enamel rods to bond to.
Conventionally, cases like this are treated using full rubber dam, floss tie and perhaps a clamp or two in place in order to isolate, which is crucial for successful composite placement.
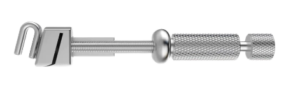
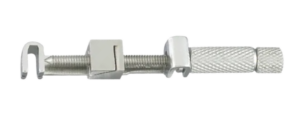
I approached isolation differently, using the Greater Curve Matrix System to provide standalone isolation for the anterior teeth where humidity was less of a concern for the bond. The system comprises a series of curved bands and works with a Greater Curve retainer (fig 4.a). A generic retainer can be seen for comparison (fig 4.b). The Greater Curve retainer is contra-angled allowing it to clear the incisal edges rather than be obstructed by them.
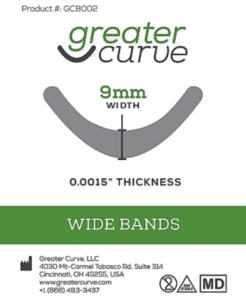
A Greater Curve Wide band (fig 5) was securely set up on the retainer, seated on the UR2 and tightened fully. A seal was achieved, preventing the ingress of blood, saliva and gingival crevicular fluid, providing isolation. The matrix flared coronally, so that it laid against the neighbouring marginal ridges.
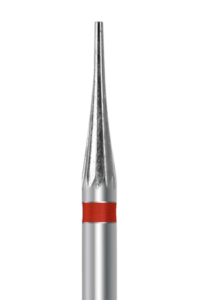
A fast handpiece with red band tungsten carbide bur (fig 6) was used to cut an access window, improving visualisation of the surface to be restored.
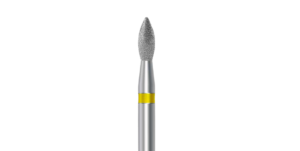
Usually, when using a matrix band, a wedge is needed to create separation to compensate for the thickness of the matrix and achieve a contact. However, I employed a technique known as contact opening. A ball burnisher was used to burnish where the contact goes, as usual, but then a fast handpiece and yellow band rugby ball shaped diamond bur were used without water (fig 7), to gently rub the matrix at the contact. The site was checked every few rubs until the final layer of matrix was removed producing a contact opening. This allowed for an anatomical contact area to be produced without relying on a wedge (fig 8).
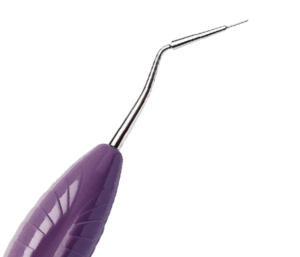
To begin composite placement, the tooth was etched and bonded. The palatal wall was built-up to an approximate length, using BRILLIANT EverGlow® shade A1/B1. A dentine layer was placed using an anterior Misura instrument (fig 9) to set the dentine thickness. This allowed enough space for stain and the enamel layer, without producing an enamel layer too thick that it creates a greyish and dull appearance.
MIRIS 2 White Effect Shade tint was then used sparingly – an effective tint should be barely visible when placed on the dentine layer. A final uninterrupted surface layer of BRILLIANT EverGlow® translucent shade was placed, blending into the tooth.
The Greater Curve matrix was then removed and the finishing process was undertaken to achieve the desired form with the patient sitting up in the chair for a more direct view. At this stage, while the patient preferred to close the mesial embrasure space of the UR2 to match the UL2, and she wished to leave composite placement on the UL2 until a later stage. The UL1 and UL2 incisal edges were restored freehand.
Final polishing was carried out using a slow handpiece and DIATECH polishing wheels from Coltene, during which my dental nurse used a three-in-one syringe to provide water lubrication. A pink wheel was used, followed by a blue wheel (fig 10).
Outcome
The treatment was successful, because the remaining tooth tissue was conservatively prepared, a verifiable seal was present, well condensed void-free composite was placed and the restorations were provided start to finish in 40 minutes. Both my patient and I were very happy with the result as demonstrated by both of our ear-to-ear smiles!
The combined use of a reliable matrix system and high-quality composite bonding systems allowed me to produce composite restorations, simply, predictably and profitably.
Dr Sunny is a key opinion leader for Coltene and Director of the DRE Composite Course.
For more information, info.uk@coltene.com and 0800 254 5115
COLTENE website https://www.coltene.com/
Case Study Images: