Minimally invasive preparation treatment of a large maxillary median diastemata – Dr Alina Lazar
Featured Products Promotional FeaturesPosted by: Dental Design 22nd July 2019

The aim of this study is to present a case with a large maxillary median diastema of 2.8mm. The patient was a 19-year-old student who lived approximately 400 km from my office in Germany.
He attended the practice following a recommendation from one of my colleagues. For many patients a diastema is not a problem, but in this case, the patient disliked the aesthetics of his smile because of the gap. The patient was therefore looking for a solution to improve the symmetry of his anterior teeth and improve the proportions between the UL3 and UR3. He was also looking for a minimally invasive form of treatment, so we focused on procedures that required no tooth preparation and discussed the ABB (Align, Bleach and Bond) concept.
Assessment
A comprehensive orthodontic assessment was performed (Table 1). The patient’s full family, medical and social histories were taken. He had an enlarged labial frenum, which ran in the family, but otherwise no relevant issues were uncovered. Intra- and extraoral photographs and radiographs were taken.
Table I: Orthodontic assessment
| Skeletal Pattern | Convex | |
| Lower Face Height | Average | |
| Facial Asymmetry | Yes | |
| Soft Tissues | Normal | |
| Overjet | 2mm | |
| Overbite | 4mm | |
| Crossbite | No | |
| Displacement on closure | None | |
| Incisor relationship | Class I | |
| Molar relationship | Class I | |
| Canine relationship | Class I | |
| Teeth Present | 7654321 | 1234567 |
| 7654321 | 1234567 | |
| Centrelines | 2mm deviated to the right | |
Treatment planning
A bite registration was completed and impressions were taken using Impregum (3M Oral Care). The Archwize™ digital software was used to calculate that 2mm of space would need to be created in order to achieve the desired tooth movement. This confirmed that the Aligner Light system from IAS Academy would be suitable for treating this case. The IAS laboratory also provided a 3D model of the proposed final outcome of treatment, which was very useful in managing patient expectations and achieving patient compliance throughout the treatment process.
The treatment plan was therefore to straighten the teeth using the Aligner Light system from IAS Academy, using Romexis smile design software (Planmeca). We would then look to perform crown lengthening and a frenectomy, finally providing retention for long-term maintenance of the results.
Table 2:
| Problem List |
| Diastema of 4.38mm in the upper arch
Multiple diastemata in the lower arch |
| Ideal Treatment – Aims: |
| Align the upper and lower teeth
Close upper and lower diastema |
| Compromised Treatment – Aims: |
| Close the diastemata only, achieving a good aesthetic result (the bite was neutral so this was an option) |
Treatment
Following professional tooth cleaning, the first Aligner Light was fitted and the patient was instructed to wear it for 22 hours a day. Hewas shown how to place and remove the aligner, and provided with oral hygiene advice.
The patient was given the first four alignersand everytwoweeks we spoke via Facetime to check the position of the teeth and confirm changing to the next alignerwhen necessary.The anterior alignment aspect of treatment as complete in just eight weeks, achievingsatisfactory symmetry between the UL3 and UR3.
The next stage of treatment involved enhancing the aesthetics of the smile. There were two stages involved: 1) Impressions were taken and the dental technician created a wax-up model to follow using a flowable injection technique to build up the teeth. 2) The impressions and post-alignment photos were then used in the Romexis Smile Design software (Planmeca)to design the final smile.It only takes a few minutes to design a smile with a 2D face photo and intelligent tooth silhouettes. The software allows you to manipulate the position, shape and dimensions of each tooth individually to achieve optimalaesthetics.
The proportion of the central incisors present compared to the final result in the smile design was 88%. The file was imported into a CAD/CAM system in order to finish the 3D design and print 3D models.
The next phase of treatment involved crown lengthening in order to establish harmony of the gingival marginacross each tooth. This is key in the creation of a beautiful smile. In this case, the gingiva and papilla levels on UL1and UR1were gently remodelled.
One week after the gingivectomy, Exaclear vinyl polysiloxane (GC Germany) was then used to replicate the previously prepared 3D diagnostic wax-up. The clear matrix was placed over the unprepared teeth and used as a guide for the G-ænial Universal Injectable(GC) composite resin A1 to be injected into and cured. The transparency of the material makes it ideal in challenging anterior cases. You can check every last detail and it prevents the formation of an oxygen inhibition layer to facilitate final polishing. It is also easy to use and demonstrates good rigidity once set. Using these products, I was able to create a restoration that was as aesthetic as veneers, but quicker, more affordable and less invasive.
To ensure the alignment of the teeth was maintained, a bonded retainer was fabricated and fitted onto the upper anterior teeth. The patient was delighted with the final result achieved, which had closed the diastema completely and created symmetry of the anterior teeth.
Conclusion
Ultimately, incorporating smile design is an importantaspect ofthe ethos inmy practice. Although finishing with composite contouring or veneers depends on the individual case, it is crucialto work as minimally invasively as the case allows. Indeed, I have found that when the above mentioned steps are carried out in the same way as this particular case, a very satisfying result can be achieved.
Team:
- DrAlina Lazar Aligner system and Inman AlignerTrainer
- Chairperson EuropeanSociety of Cosmetic Dentistry –Germany
- Dental Raum 901 MDT Ralf Wahrheit –Specialist in Aesthetic Restoration
- Ortostrada Laboratory – IAS Academy
- Planmeca CAD/CAM Helsinki
For more information on upcoming IAS Academy training courses, including those for the Inman Aligner and Aligner system, please visit www.iasortho.comor call 01932 336470 (Press 1)
Images
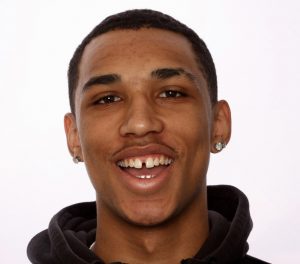
Figure 1 – Pre treatment open bite
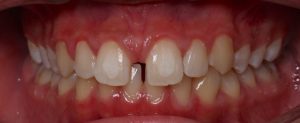
Figure 2 – Pre treatment anterior
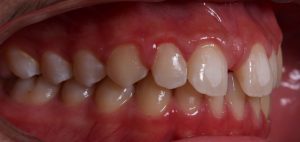
Figure 3 – Pre treatment right lateral
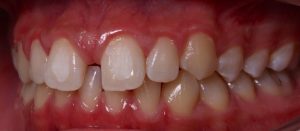
Figure 4 – Pre treatment left lateral
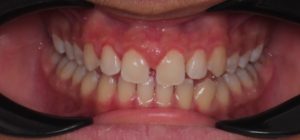
Figure 5 – Post alignment gingival recontouring
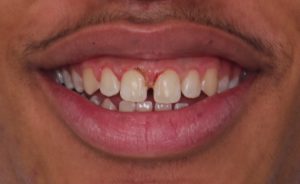
Figure 6 – Post alignment frenectomy
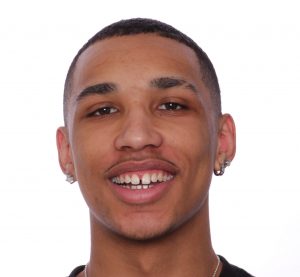
Figure 7 – Soft tissue healed
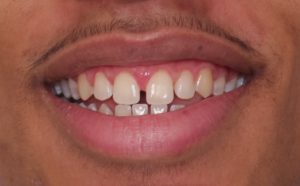
Figure 8 – Soft tissue healed anterior
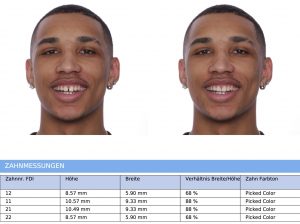
Figure 9 – Romexis Smile Design Report
![]()
Figure 10 – Silicone key with Extraclear

Figure 11 – Post treatment with composite bonding complete
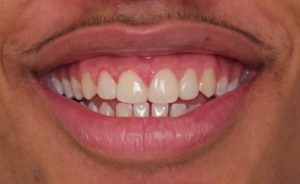
Figure 12 – Post treatment smile
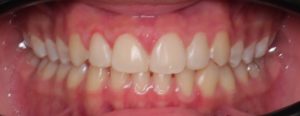
Figure 13 – Post treatment anterior
Author Bio:
Dr Alina Lazar has been practising dentistry since 1994 and founded ‘Praxis Dr. Alina Lazar’ in Germany in 2001. She completed further qualifications to become a Specialist in Aesthetic Dentistry (Germany) in 2012 and a certified provider of the Inman Aligner in 2013. Alina also completed the IAS Advanced training course in 2014 to develop her knowledge and skills in anterior alignment. In 2017, Alina became a certificated member of the European Society of Cosmetic Dentistry and the German Chairperson, as well as an Inman Aligner Clinical Instructor.From September 2018 she has been the Chairperson for International Affairs at ESCD Expanded Executive Committee.